Mutant High Racer Plans
By Nick Coppola
February 10, 2004
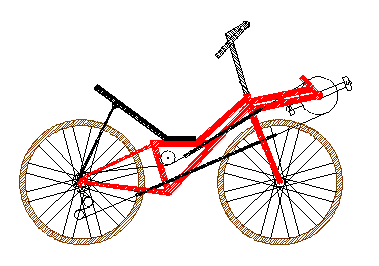
(click any image to expand it)
With high racers being all the rage these days, I started
thinking that I might enjoy one too. Since I have always liked
the performance of my old Trek racer, the idea having it’s
performance in a comfortable and aerodynamic recumbent platform
was exciting. Could this be the best of both worlds? Many people
agree. It may not have the lower air drag of a low racer, but the
lower rolling resistance wheels may make more sense to someone
like me who’s goal is to have a 20 mph cruise.
I set out to create a very simple design that would keep the
geometry of a diamond frame (DF) road bike. Since I am a firm
believer in the K.I.S.S. (keep it simple stupid) system I went
for the minimum number of critical alignment joints. This design
has only one where the boom is brazed to the head tube. After a
study of my old Trek and many design iterations I decided to keep
as much of the donor, bike including the 700c wheels, and mutate
it into a high racer. That's how the Mutant High Racer was born.
This aint no clone! A scratch built mono tube design might turn
out a little lighter, but would be more difficult to build well
requiring jigs, and it forces a shorter rider to sit even higher.
In this design one lowers the seat by making easy step by step
modifications. Still due to the large wheels and limitations of
the DF frame, people outside of an estimated 5’-4” to 6’-2”
range may not fit. It should be no harder to build than an EZ
clone.
Before Building
You will need two DF donor frames. The first will
be the basis of the final product. It should be from a light high
performance chrome-moly road bike. The size of the frame should
be approximately sized for yourself.. Measure these frames and
make sure you have the necessary tubes for the whole job.
If you are new to homebuilding, you should check out the
following links for details on recumbent construction. You will
need to know how to braze, miter tubes, build a seat, pulleys,
etc..
WISIL
projects
My
first recumbent bike page
Tim
Smith's building links
EZ clone
Tube
mitering
BMX
to recumbent conversion
Construction Steps
Do the following frame modification steps in this order to assure
that the original alignment is maintained.
1. New Top Tube
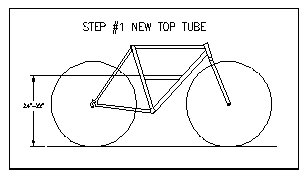
Fit and braze a section of top tube from the second DF as shown.
This will establish your seat height. The height should be in the
22”-24” range. Keep in mind that the bottom bracket
will be approximately 32 inches high, so don't make it too low.
It can be horizontal or tilted slightly up at the front. It may
be easier to get the height and tilt correct if the wheels are
installed while fitting. A higher height could also make routing
of the chain easier.
2. Reposition the Seat Stays
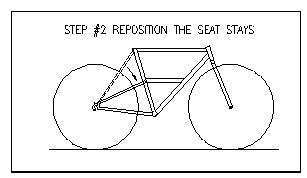
Rotate the stays and braze them to the new seat tube/top tube
intersection. First cut the seat stays at seat tube end. The
preferred method is to unbraze the drop out ends and rotate the
stays together to the new position. An optional method is to bend
the stays which is harder to do both side evenly. Then cut the
stays to the new length required, bend, miter and braze the ends
to the seat tube. Depending upon your frame geometry, you may
need to remove the brake bridge. The brake can be moved to below
the chain stays. This may require the addition of a tube or flat
plate to mount the brake.
3. Remove Old Tubes
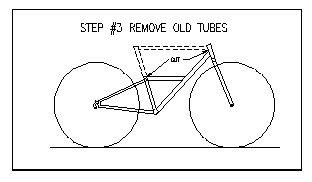
Cut off the old DF top tube at the head tube and the top portion
of the seat tube as pictured.
4. Second Down Tube
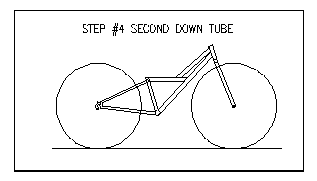
Fit and braze a new second parallel down tube from the head tube
to the top tube as shown. Use the top tube you just cut off in
step 3.
5. The Boom
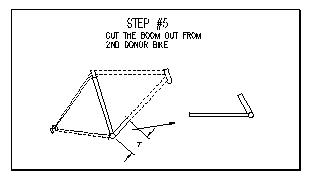
This is the hardest step. Be careful to get the length correct;
to avoid crank interference with the wheel and to braze it to the
head tube aligned with the frame. Cut the seat tube of the second
DF at the top. Cut off the chain stays at the bottom bracket. Cut
the down tube 7 inches from the bottom bracket to make a front
derailleur tube. Be sure to leave plenty of down tube left as it
will be used to strengthen the boom. Do not use the down tube as
the boom as the bottom bracket threads will be on the wrong sides.
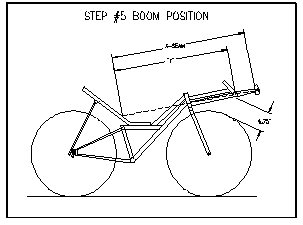
This is going to be a fixed length boom. There will be some seat
adjustment, but it is important to get the boom length close.
There are various methods to do this such as laying it all out in
cad, but here is a simple one. First measure
your x-seam as described here. Subtract 6.5 inches for the
crank arm, call this “Y”. The next step will be easier
if you install the wheels and have the help of a friend. From a
position near the back of top tube measure out a distance
“Y”. This is the bottom bracket position. Hold the boom
in place, it might be easier if the bike is laying on the floor,
and mark the cut off length on the boom, leaving room for your
miter. To avoid crank-wheel interference make sure that the
bottom of the bottom bracket shell clears the front tire by at
least 6.75 inches, assuming 170mm cranks and 1.6 inch O.D. bottom
bracket shell.
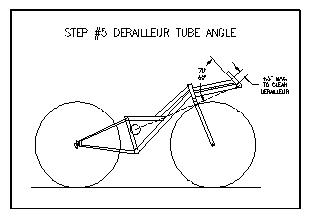
After mitering, check the fit of the boom carefully before
brazing. Also, it’s important to have the correct angle of
the front derailleur tube to insure proper shifting. To check
this estimate the position of the drive side chain pulley and run
a string from the pulley location to the center of the bottom
bracket. Now measure the angle between derailleur tube and the
string. The angle should be close to 65 degrees. If its way off
try locating the pulley higher and check again. If it’s
still not close you’ll need to reposition the derailleur
tube. One simple way would be to make a partial cut 90% through
the tube near the bottom bracket, bend into position and braze.
To strengthen the boom add a second parallel tube above it
attaching to the derailleur tube in a position that does not to
interfere with proper derailleur position. The addition of the
vertical tube in between should add further stiffening.
An option for more advanced builders would be to fabricate a mono
tube boom from 1.75-2.00 inch chrome-moly or muffler tubing.
Built properly it could be lighter and stiffer and even
adjustable.
Completing the Bike
The frame is now 95% completed, but there is still lots of
details such as the seat, handlebars, chain path, etc. to
complete the bike. All these part can be purchased for a price or
fabricated if desired.
The Seat
Many options exist for a seat. It can be made from composites,
wood and foam, or tubing and mesh. Purchase prices can run $200
for a Rans type seat to over $300 for a carbon fiber hard shell
design. There are many seat plans available on the internet for
the home builder, see above references. Here’s
another example. Keep in mind that since this bike has a high
bottom bracket that you will need the seat to be quite reclined
to get a comfortable open riding position. Some seat designs may
not be suitable.
The Handlebars
Handlebar choice can be very personnel. You may be happy with a
bar made for a mountain bike or an old upright. You may want to
bend your own from chrome-moly or conduit, or you can buy a
recumbent specific bar.
To keep your knees from striking the bars you’ll need a stem
riser which may require a quill. These can be purchased or
fabricated as per my
page.
The Chain
The chain consists of 2+ regular length ones. The top drive side
will need a pulley to direct it under the seat and through the
rear triangle. This can made from an inline skate wheel, bought
from McMaster Carr (www.mcmaster.com
part #6234K3) or recumbent specific. To mount the pulley
fabricate a bracket from 1/8 inch steel plate and braze it to the
frame as pictured. If you want a more moveable solution, you can
mount it to a clamp such as found on the WISIL
site. You will also need a chain tube on the bottom to avoid
rubbing against the fork and frame. You may want or need one on
top too as the chain may slap against the frame or get your leg
dirty. These can be cut from 1/2 inch water pipe or teflon tubes.
Hang them off the frame with zip ties.
Note, the chainline as outlined here may contact the front tire,
or front brake during very low speed sharp turns. This should not
be cause for alarm as it will rarely happen and then only be a
nuisance. The lower chain tube may also contact the fork
depending on it’s the width. If this should interfere with
the function of the chain you can reroute the chain over the fork
with an additional pulley.
Notes:
To date I have yet to build my high racer. I'm stiill looking for
the right donor bikes and not about to chop up my Trek. Therefore,
this is an unproven design and the success of a bike made to
these plans is unknown. The questions to be answered when the
bike is completed are: Will it have the desired strength and
stiffness?; How convoluted will the chainline be?; and Will I be
able to ride it at all due to the high bottom bracket?
The plans are posted for the free use to the homebuilding
community. In setting out to build your own bike you do so fully
knowing that there are risks involved with building and riding
your own bike. Please follow all safe building and riding
practices. If you want to use these plans, or think that this
site is helpful, please send me an e-mail (coppola1962@yahoo.com)
as I’d love to hear from you.
Copyright Nick Coppola 2004 All Rights Reserved