
Building Recumbent #1
by Nick Coppola
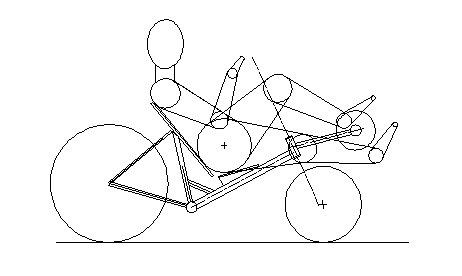
While attending the July 2000 HPV race in Northbrook I was bit with the lowracer bug and had to build one for myself. By the way a HPV stands for "Human Powered Vehicle", which could be any kind of vehicle powered only by the rider. After a couple months of researching on the web I started work.
This design utilizes portions of 3 salvaged bikes: Rear triangle of a 24" Ross 10 speed; The wheel, fork, head tube and handle bars from a little girl's 16" Huffy; The down tube and bottom bracket from a very heavy Sears Free Spirit 10 speed. As this was my first attempt I saved the nice chromemoly frames for bike #2. For the main tube I went all out and ordered a 1.625 diameter chromemoly tube from Wicks Aircraft Supply. The seat height would be a sporty 12" off the ground.
Since this design is similar to many found on the internet I will skip the construction details. Below I added tips for things I did not find help for and links to great sites that will help other rank amateur builders out there.
Riding Impressions and Modifications

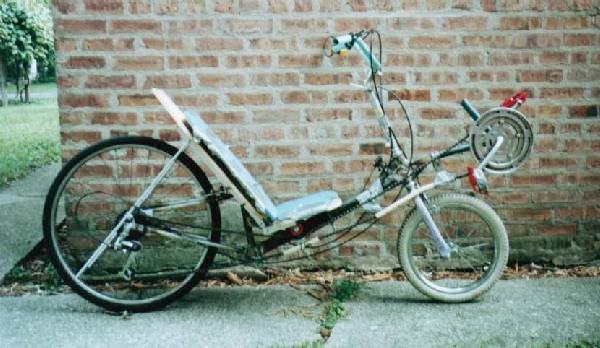
Spring 2001-The picture above is from one of my first rides. Boy was I having fun. It was like I just learned to ride. The little kids love it and chase after me and yell out, "Cool Bike"! The adults mostly just look puzzled. After short trips of less than 1 mile I found that my quads burned. I guess I was trying too hard and was not used to a recumbent position. Quickly I found the bikes short comings. First the seat I made out of 3/8" plywood broke. I had used derailleur pulleys to guide the chain and the chain kept on falling off and eventually the drive side pulley broke. That pulley was not meant to take a lot of load. Also, the bike was a handful to steer and would dart off wildly. Time for some modifications.
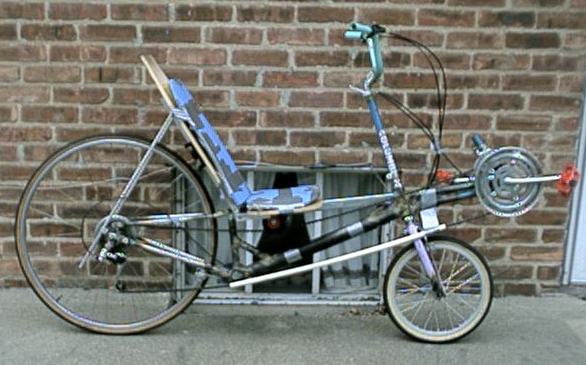
Summer 2001-First was a new seat out of 1/2" plywood with an adjustable seat back angle. Strong and more comfy. As far as the handling goes, I determined that I miscalculated the amount of trail and wound up with a lot of wheel flop. To temporarily solve this I made some bolt on extensions to the fork dropouts to add rake. This did the trick, handling was much better and the flop was gone. Then I got serious about chain management adding a large nylon pulley on the drive side and chain tubes made from 1/2" water pipe to the bottom. Now the chain stayed on! Longer rides were possible. I also upgraded the rear tire, front wheel, pedals, handle bar, and rear derailleur.
After riding this configuration for around 150 miles, mostly made up of rides less than 5 miles, I was asking myself "Why can't I cruise at even 12 mph when I can do 15 on my Trek?" Two possible answers came to mind:
1. High frictional losses due to low quality componentry and the low pressure rear tire. A simple coast down test on both bikes showed that the Trek was much better.
2. My body was not getting used to the low seat/high pedals. Years of riding upright bikes acclimated my legs to the point were they spin the pedals effortlessly. This did not feel natural. My feet often felt like they were going to fall off the pedals and I found that I was expending energy just keeping them on. I did try toe clips which don't really work on a recumbent. "Clipless" pedals were not an option since the one piece crank wont accept them.
I was determined to make recumbancy work for me, so I came up with the following mods to try to help.
Fall 2001-I decided to raise the seat. This would have 3 benefits: helps with pedaling, more visible to traffic, and reduce chain friction. I bolted on a square top bar which raised the seat height from 12" to 18". With this I felt more comfortable and pedaling was easier. Unfortunately winter was coming and not many miles were logged. I was also playing with the idea of shoehorning a high quality 27" rear wheel that I had into the space of the 24" wheel. This would have benefits of: reducing rolling friction, lowering weight, and tilting the whole bike forward increasing the steering angle and eliminate the need for the dropout extensions. After some careful measurements I determined that it would fit with only minor modifications to the chain and seat stays. The wheel mod turned out great and the handling seems sorted out.
Summer 2002-After riding half the summer and I lowered the seat again. I don't know if it improved speed any but it is more fun being down low. I added a lot of seat padding and it's finally comfortable. I installed handle bars from a cruiser style bike which gives a much better hand position. The old Free Spirit crank fell apart during a ride and I replaced it with a cottered crank from a 1970's "Kia" which spins much smoother. The boom is now adjustable in length and I can use better pedals too.

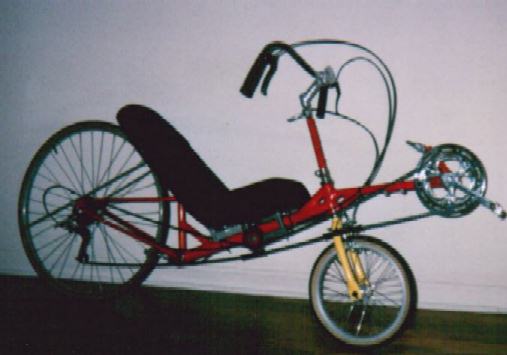
Spring 2003-I decided it was time to make it look nice. Amazing what $10 worth of paint can do. It's a real looker now. Too bad it didn't get any faster.
January - February 2004-Since this bike donated it's rear wheel and seat to the lwb project, I went to work rebuilding the bike and was also hoping to shed some of it's 38 lbs. in the process. I had the components to make a wheel, so I laced one up and it came out pretty nice. I made the new seat out of a very good grade of 3/8" birch plywood vs. 1/2" for the old seat. I decided to go as simple as possible with the hinge between the base and back. I drilled holes and tied them together with zip ties. I am weary that they may break, so I plan to switch to some very strong, 160 lb strength, string. As for the seat mount, I replaced 2 muffler clamps, 4 long bolts, 8 nuts and washers with 2 hose clamps. I have the hose clamps on both bikes and they seam to work great. You put 2 slots in the seat base parallel to the tube and feed the clamp thru the slots and around the tube. Much easier to adjust too. The old idler pulley did not spin well so I made a skate wheel type.
When I took it for a test ride the old cottered crank went out on me. I found out that the bottom bracket shell has standard threads, but is a little wider. I had an old bottom bracket some and after some trial and error and mixing up different cups I got it to fit reasonably well. Yea! I now have a Shimano 105 crank installed, thanks to a friend's donation, which weighs a fraction of the old steel one. With all the new mods it now weighs 34-35 lbs and I can really feel the difference. I also shortened up the distance to the pedals and adjusted the seat back to be more vertical. It feels like a more powerful position and it's easier to spin as well. Now we're starting to rock!
March 2004-With the bike performing better than ever, I decided to make one more big change. The boom and bottom bracket are very heavy and flex too much stealing power each pedal stoke, so I replaced the skinny tube with a 1.75 x .049 muffler pipe. I figured the change would save over 1/2 lb in weight. I also added 2 brackets on the seat stays for the seat brace clamps. This shortens the braces and stiffens the seat. I'm also hoping that it will soften the jolts I get to the back from bumps in the road. I went for one longer ride so far. This was my fastest ride on a recumbent ever, cruising 17-18 mph at an average of 14.7 mph. That's as good as I can do on my road bike. My goal of 15+mph averages appears to be within my grasp!

Homebuilding Tips
Brazing With MAPP
Most steel bikes are brazed and not welded. The tubes will warp if you try to arc or mig weld them. You don't need an expensive oxy/acetylene outfit to braze a bike. Use a MAPP/air torch as MAPP/Oxy uses a lot of Oxy which is expensive. I used the Bernzomatic JTH7. Available at most hardware stores. It has a 3 foot hose so you don't have to hold up the bottle and will work on almost all joints. Since it can be pretty slow when you come to a big joint it may be helpful to add a second propane torch to add heat. Have someone help out. I used Gasflux C-04 brass filler rods and Type "B" Blue Paste Flux after using some generic rods and silver flux and it was easier to use and I got better joints, worth ordering. Get it from Henry James Cycles. For great tips on fillet brazing bikes see this excellent page by Mark Stonich. Read it a few times and make sure to follow all safety practices. I also read the book "Modern Welding" which is very helpful. My method for using MAPP to braze is to turn the torch up until it make just starts to make a ratty sound and heat the whole joint for a few minutes. Afterwards I concentrate the flame where I want to start and turn up the torch a little more. For larger joints you my have to crank it all the way up. When the metal looks like a Dreamsicle orange/red thru my green #3 tinted glasses it's time to add the filler rod. If done right the rod will become molten, like the melting popsicle, and you will get a strong joint. If not the rod will not flow and will stick. If that happens concentrate the heat and take away the rod until it's glowing again. Now the idea is to take this process and walk it around the joint and try to build up a fillet. The fillet doesn't have need to look perfect to be strong enough. I don't claim to be an expert, but this is what worked for me.
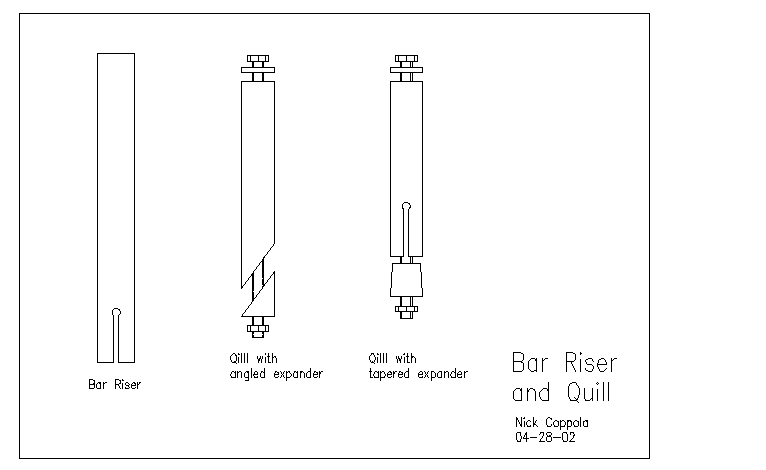
Handle Bar Riser and Quill
A big question I had was with how to mount the handle bars. A riser tube was easy. Take a tube with the correct I.D. for your bar stem, I found that a frame seat tube will work for me, cut to length and slot the end if you don't already have a seat tube slot. A seat clamp from a cheap bike works nicely to clamp the riser to your quill. At first for a quill I took a cheap bike seat stem and epoxied it inside my fork. This worked for maybe 100 miles then the epoxy cracked. My latest answer is much better. You'll need the bolt and expander from another bar stem and a seat stem tube. See the drawing here for details.
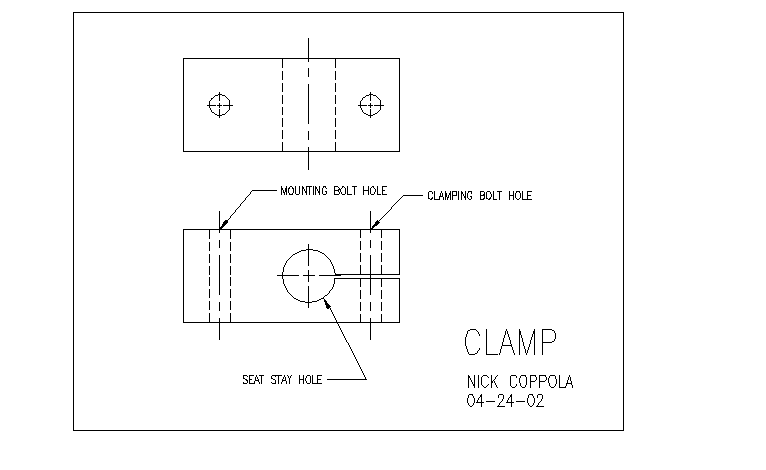
Seat Stay Clamps
Bill Murphy taught me how to make a small clamp for adjustable seat back stays out of aluminum square stock. Simple, you need to drill 3 holes and make 1 cut. See the drawing here for details.
Trail
Some words about Trail. You don't want too much. It will make for a less stable, not more stable geometry. My bike at first had over 3 inches trail and the steering flopped and the bike was hard to control. Increasing rake lowered the trail to 2" which worked well. Learn more here.
Metal Cutting
For much of the construction I had used a hack saw and files which took a long time. Later I got wise and bought an inexpensive angle grinder and went mad with power! How did I ever live without one.
Helpful Links
The WISIL HPVers is packed with lots of HPV building details and pictures of HPV racing.
Australian Tim Smith has just about every design and building resource on the web linked to his site.
Bicycle maintenance articles by Sheldon Brown filled with hard to find information.
Software that really helps with mitering tubes at the proper angles for brazing. Download software here.
Brazing goggles, nylon idler pulleys and a lot more from McMaster-Carr
Mailing lists, you can learn a lot and ask questions:
Framebuilders Info;
HPV;
Lowracer;
Streamliner;
Recumbents
GO TO NEW RECUMBENT HIGH RACER PLANS
Send me an e-mail at coppola1962@yahoo.com
